Here is the link of an image i am working with, but i can't make it to smothly rotate. What should i do?
http://www.marysolpublicidad.com/360/SG3.swf
hope somebody can help me...
Nico
Image is not Smoth what can i do?
Hi there Nico
The panorama works here quite smooth, didn't notice any performance problems.
Perhaps you could share your specs so we can compare? Are you by any chances viewing it in Safari browser?
Because this particular browser has many issues when comes to Flash performance.
Secondly, if I may, I notice your image is really blur. Is it the original source image or just something you upload as an example?
Generally this is the kind of "crisp" you should be getting out of your pano http://www.johnhpanos.com/hays3.swf
regards
Sebastian
-
nicolastarallo
- Posts: 8
- Joined: Mon Nov 16, 2009 5:26 am
Sebastian,
Than you very much for your reply.
Here is a new image link i am testing.
http://www.marysolpublicidad.com/360/galeriafrente.swf
I think is much better.
I set the window size to be 1440x900, then i press the optimal button with a cube face of 1285px
70% compresion, frame rate 50 , and render quiality 9.
is this OK?
best regards,
Nico
This one does look better 
And when comes to performance, seem smooth as well just like the previous panorama.
regards
Sebastian
And when comes to performance, seem smooth as well just like the previous panorama.
regards
Sebastian
-
nicolastarallo
- Posts: 8
- Joined: Mon Nov 16, 2009 5:26 am
Hello ,
Here y made a little tour, but i don't know how to put a little spot or something to mark that aerea so people in the tour would know where to click.
thank you for your help.
Nico
http://www.marysolpublicidad.com/360/entrada.swf
Here y made a little tour, but i don't know how to put a little spot or something to mark that aerea so people in the tour would know where to click.
thank you for your help.
Nico
http://www.marysolpublicidad.com/360/entrada.swf
Dear Nico
Check http://gardengnomesoftware.com/tutorial.php
Look for "Hotspots" down the page. From easy one, to more complex panorama linking.
regards
Sebastian
Check http://gardengnomesoftware.com/tutorial.php
Look for "Hotspots" down the page. From easy one, to more complex panorama linking.
regards
Sebastian
-
nicolastarallo
- Posts: 8
- Joined: Mon Nov 16, 2009 5:26 am
Thank you again! i fuond it very good!
Sory to keep bodernig you, but maybe you know how to make a FULLSCREEN?
Because it's works just perfect in my computer, but when i upload it, i keep having the frame of the browser.
Do you know how to do it?
best regards,
Nico
Sory to keep bodernig you, but maybe you know how to make a FULLSCREEN?
Because it's works just perfect in my computer, but when i upload it, i keep having the frame of the browser.
Do you know how to do it?
best regards,
Nico
Hi there Nico
Place the SWF file into HTML document and enable the fullscreen in your object / embed tags using the parameter: "allowFullScreen", "true"
For example, using SWFobject would be:
<script type="text/javascript">
var so = new SWFObject("panorama.swf", "pano", "800", "600", "9", "#999999");
so.addParam("quality", "best");
so.addParam("allowFullScreen", "true");
so.addParam("menu", "true");
so.write("flashcontent");
</script>
What method are you using to embed the files ? Standard Flash method, SWFobject or Panor2VR generated html ?
-
nicolastarallo
- Posts: 8
- Joined: Mon Nov 16, 2009 5:26 am
Hi Sebastian,
I only upload de .swf movie to my web page and thats it...
Do i have to make a web page for full screen? or that code comes with the HTML in the PANOtoVR HTML option?
I am don't know HTML code... just very little.
Thank you for your patienece.
Nico
I only upload de .swf movie to my web page and thats it...
Do i have to make a web page for full screen? or that code comes with the HTML in the PANOtoVR HTML option?
I am don't know HTML code... just very little.
Thank you for your patienece.
Nico
It is always recommended to run your swf files within html document and open that HTML rather than swf directly.
The HTML document uses object and embed tags (depends on browser) to provide the browser with player information, define number of preferences from color to file versions, size etc... If a user with an older player try to open incompatible file (new file - older player), it will simply fail to run w/o any kind of warning. I would suggest you embed the file in HTML. Not to mention that when you call SWF directly, you won't have a title in your browser bar but an ugly looking path to the file location on your server.
It's like driving the car w/o body, you sure can but the body does many more things than just the aesthetics
You could use Pano2VR to generate HTML and the JS file, then upload all the files to your server, or you could look up in Google "SWFobject" and use that instead. You will still use html, it's just slightly different embedding method which personally I like more.
i have also this problem like i put good sharp panorama in program & in the end i get some smooth result.
for example i have original panorama file:
type: JPG
size: 18 MiB (6000x3600pix - not sure exactly)
so if i make SWF file it become something like 3 - 4 MiB
example: http://www.eldariel.nl/360/nl/zandvoort/DSC_1175.html
when i decide to reduce size and make lite version than i have smoth pano
size: 4 MiB (50% size off)
SWF file: less than 1MiB
example: http://www.eldariel.nl/t3mp/360/theclub/DSC_5634low.swf
so any secret option to get final results like 2MiB with same quality line here? http://www.johnhpanos.com/hays3.swf
It's generally recommended to import to Pano2VR highest quality image, then control the compression and tile size upon export, and work out the quality versus file size to suit your needs. Best to work with uncompressed format like *.tiff, not JPG. Also, DO NOT shoot in JPG, RAW or TIFF ONLY !!! (Nikon D700 in my case can directly save tiff)
Secondly, Flash always smooths images (flash player does it automatically) so you can slightly over sharpen the image just for the Pano2VR output. Normally I will change the color mode to LAB Color, open the channels, apply unsharp mask to the Lightness channel and set it back to RGB. Then I will use High Pass and gradually sharpen different parts of the photo. For example, I duplicate the layer once, apply High Pass filter (example only) at 0.2 or 0.4 not to over burn the fine details. Change the high pass layer to Overlay mode. You can then duplicate that layer few times and watch how it sharpens your image further. If you notice that some parts of the image are getting too sharp, you can use the erase tool to erase the over sharpened parts from the high pass layer while leaving the rest intact. I will have multiple duplicates of High Pass layers, only covering specific parts of the image.

*when sharpening the image above, the houses closer to camera were getting too sharp, while the one in distance remain slightly blur. I ereased a bit of the gray from few layers and continue to duplicate it till the distant one became crispy clear.
Again, you can over sharpen slightly because upon export from Pano2VR , Flash will be smoothing your bitmap images so it will all balanced out.
I guess there is also some small problem with your image to start with. It does not seem generally sharp. Make sure you find the "sweet spot" for your particular lens. Each lens has one. Take for example the 8mm Sigma (Canon mount), its sweet spot is at f8, somewhere between .5 and 1 on the focal length. Use ISO 100 if possible.

TAKE NOTE!
It can also depend on individual lens. So happened that for most of the Sigma users that's the spot, but sometimes it might be milliliter to the left or right.
You will need to test it to find out.
Best regards
Sebastian
Secondly, Flash always smooths images (flash player does it automatically) so you can slightly over sharpen the image just for the Pano2VR output. Normally I will change the color mode to LAB Color, open the channels, apply unsharp mask to the Lightness channel and set it back to RGB. Then I will use High Pass and gradually sharpen different parts of the photo. For example, I duplicate the layer once, apply High Pass filter (example only) at 0.2 or 0.4 not to over burn the fine details. Change the high pass layer to Overlay mode. You can then duplicate that layer few times and watch how it sharpens your image further. If you notice that some parts of the image are getting too sharp, you can use the erase tool to erase the over sharpened parts from the high pass layer while leaving the rest intact. I will have multiple duplicates of High Pass layers, only covering specific parts of the image.
*when sharpening the image above, the houses closer to camera were getting too sharp, while the one in distance remain slightly blur. I ereased a bit of the gray from few layers and continue to duplicate it till the distant one became crispy clear.
Again, you can over sharpen slightly because upon export from Pano2VR , Flash will be smoothing your bitmap images so it will all balanced out.
I guess there is also some small problem with your image to start with. It does not seem generally sharp. Make sure you find the "sweet spot" for your particular lens. Each lens has one. Take for example the 8mm Sigma (Canon mount), its sweet spot is at f8, somewhere between .5 and 1 on the focal length. Use ISO 100 if possible.
TAKE NOTE!
It can also depend on individual lens. So happened that for most of the Sigma users that's the spot, but sometimes it might be milliliter to the left or right.
You will need to test it to find out.
Best regards
Sebastian
-
360Texas

- Moderator
- Posts: 3684
- Joined: Sat Sep 09, 2006 6:06 pm
- Location: Fort Worth, Texas USA
- Contact:
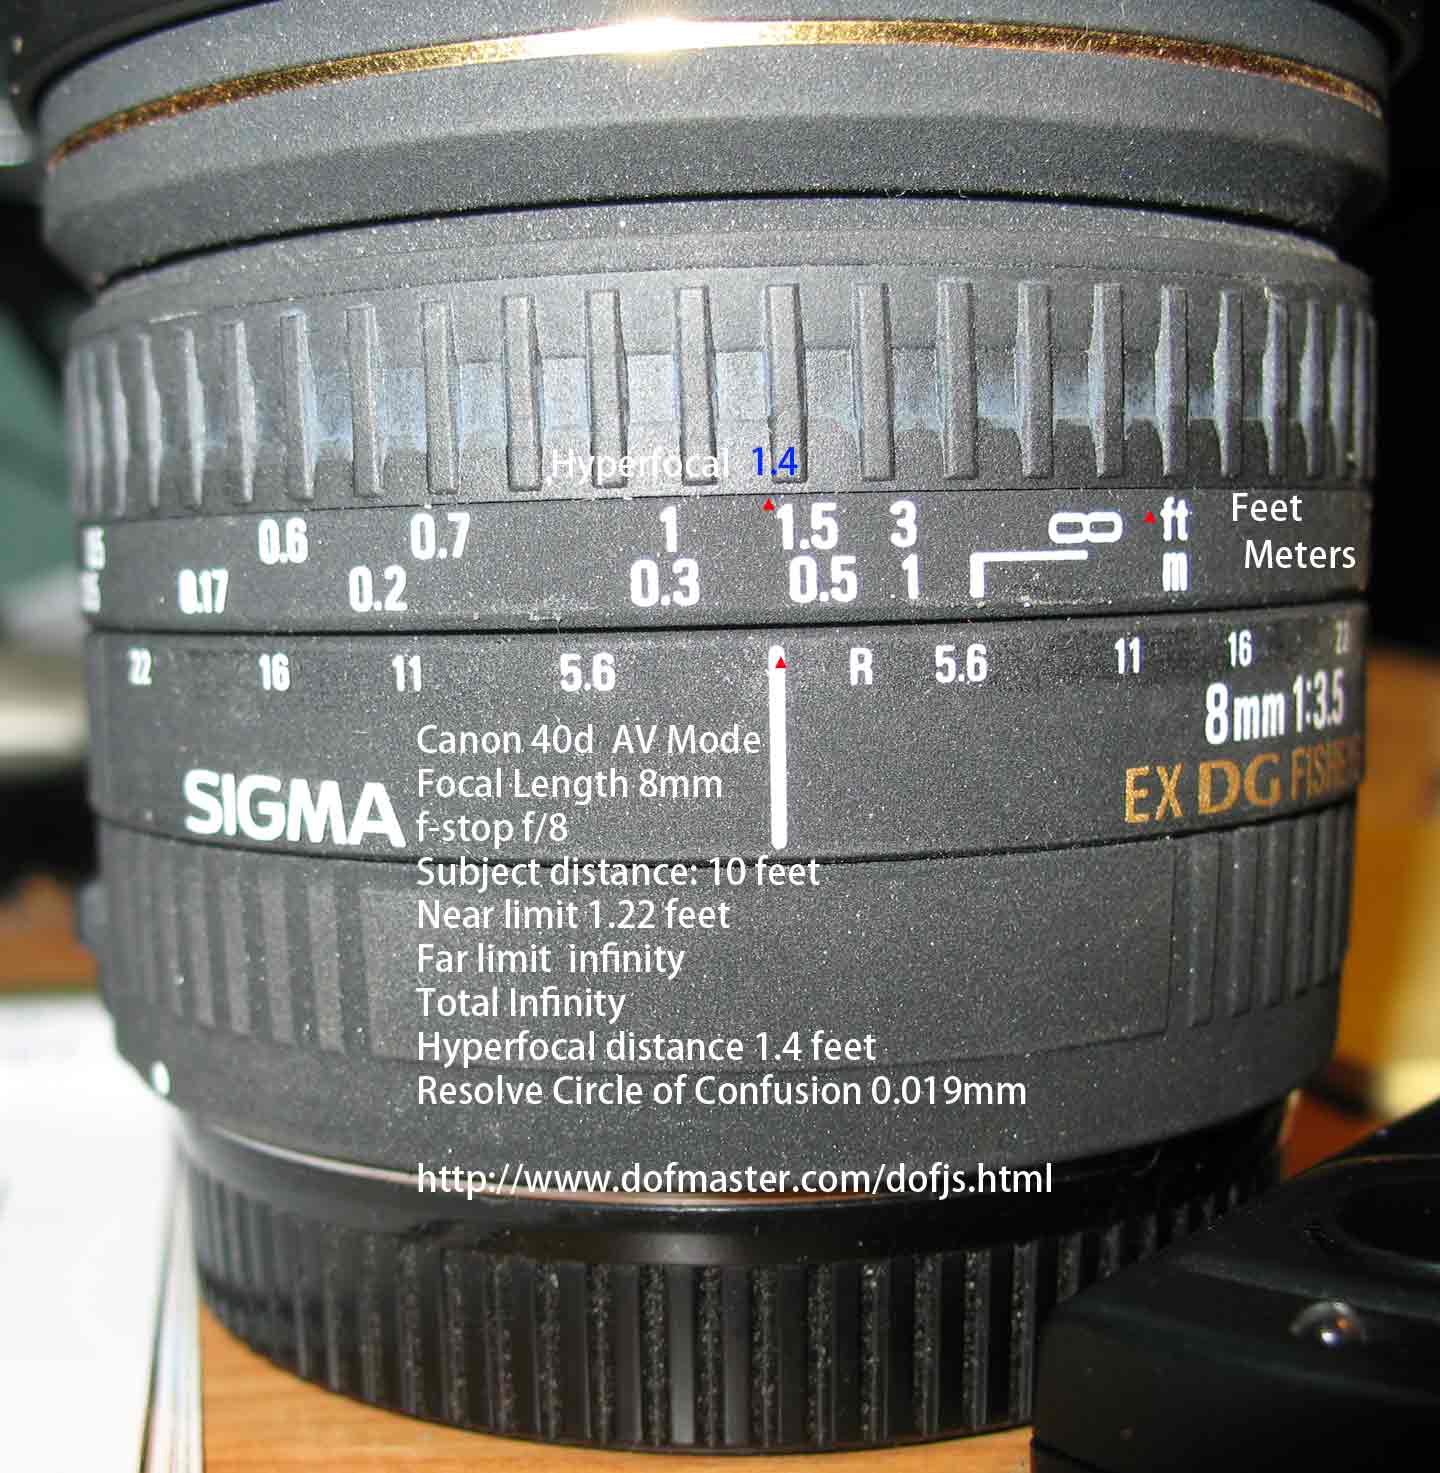
I sort of agree with the Canon 50d, 40d, 10d, T1i, 20d etc camera types and Sigma 8 using the sweet spot f/8 and using A/v mode.
Canon 5d and other camera/ lens combinations have different f/stop requirement and hyperfocal distance values
But just to prove to yourself the hyperfocal distance is set for best sharpness
You might consider of refining this hyperfocal distance position:
Set your camera/Sigma 8 - tripod up 3 feet from a brick wall – high texture detail -
Don't need big photo's. Set your camera resolution to take images that are [M] fine (rounded icon).
You will need to first set your aperture to f/8 and A/v mode
Set the focus ring at the 1 foot mark take a picture.
Rotate the focus ring to half way between 1 and 1.5 take another picture.
Rotate the focus ring to position shown in photo below [estimated at 1.41] take a picture.
Rotate the focus ring to 1.5 take another photo.
Just to demonstrate how out of focus this can get.. take another one at 3.
Open ALL of them into your favorite photo editor. Arrange them left to right in the order taken.
Zoom into 100% for ALL images.
Pick which image you consider to be sharpest and notice the focus ring value for that image. Probably will be near to one shown in the below photo.
Once you have found the sharpest focus value in feet…. Use some black electricians tape on opposite sides of the lens housing to keep the ring from rotating.
IMPORTANT -> if you too much light then you will need to reset the aperature f-stop and hyper focal distance
A/v mode, switched to manual focus
f-stop and hyperfocal distance in feet
f/4 = 2.79
f5.6 = 1.98
f/8 = 1.41
f/11 = 1
f/16 = .72
http://dofmaster.com/doftable.html

-
nicolastarallo
- Posts: 8
- Joined: Mon Nov 16, 2009 5:26 am
Thank yoi very much for all of your replies... now i have lot of work to do!
best regards,
Nicolás
best regards,
Nicolás