Hi everybody,
Just wanted to konw if anyone has had problems with vertical lines in Skies when wrapping around panoramas in equirectangular view.
I attach two examples of it. I guess it is because when pano joins both sides of the picture, each side doesn't have the same exposure value.
Thanks.
Diego
How to fix Vertical Lines in the sky
-
360Texas

- Moderator
- Posts: 3684
- Joined: Sat Sep 09, 2006 6:06 pm
- Location: Fort Worth, Texas USA
- Contact:
You are looking at the extreme left and right or joining edge of your original panorama.
Panoramas are 2:1 ratio like 5000 x 2500.
The software viewer is expecting a 2:1 ratio image
Looks like you might have inadvertently re sized your image to 4999 x 2500 or 1 pixel width smaller.
Just change the image width back to 5000 wide while maintaining the 2500 height.
Panoramas are 2:1 ratio like 5000 x 2500.
The software viewer is expecting a 2:1 ratio image
Looks like you might have inadvertently re sized your image to 4999 x 2500 or 1 pixel width smaller.
Just change the image width back to 5000 wide while maintaining the 2500 height.

-
360Texas
- Moderator
- Posts: 3684
- Joined: Sat Sep 09, 2006 6:06 pm
- Location: Fort Worth, Texas USA
- Contact:
Hello Diego
Sometimes that vertical line is only seen in the display viewer.
Appears there are 2 lines might have been created when you stitched your original image ? What panorama stitcher did you use to make the panorama?
Constructive comments:
I borrowed your image for a closer look in Photoshop. Yes, I zoomed in and found 2 areas that need correcting.
In my stitcher PTgui.com I would place 2 control points along each area on the river wall (see white vertical line showing area) and restitch.
If you can level the image the horizon to correct that also might work.
by the way. Its a great panorama image...
Dave
- panorama area review
- pano-5review.jpg (58.97 KiB) Viewed 10917 times

My Sony camera has Auto Exposure Lock (AEL)
i think the lock funktion has to be set in the menys on most cameras
starting shooting against the sun locking the Exposure do the work
EDIT: For the ready made panoramas the patch tool and Photoshop
will fix it for sure.
i think the lock funktion has to be set in the menys on most cameras
starting shooting against the sun locking the Exposure do the work
EDIT: For the ready made panoramas the patch tool and Photoshop
will fix it for sure.


PTGUI or PTGUI PRO ? the Pro are the bestVirtualshowhouse wrote:Btw I work with PTGUI to stitch my panoramas.
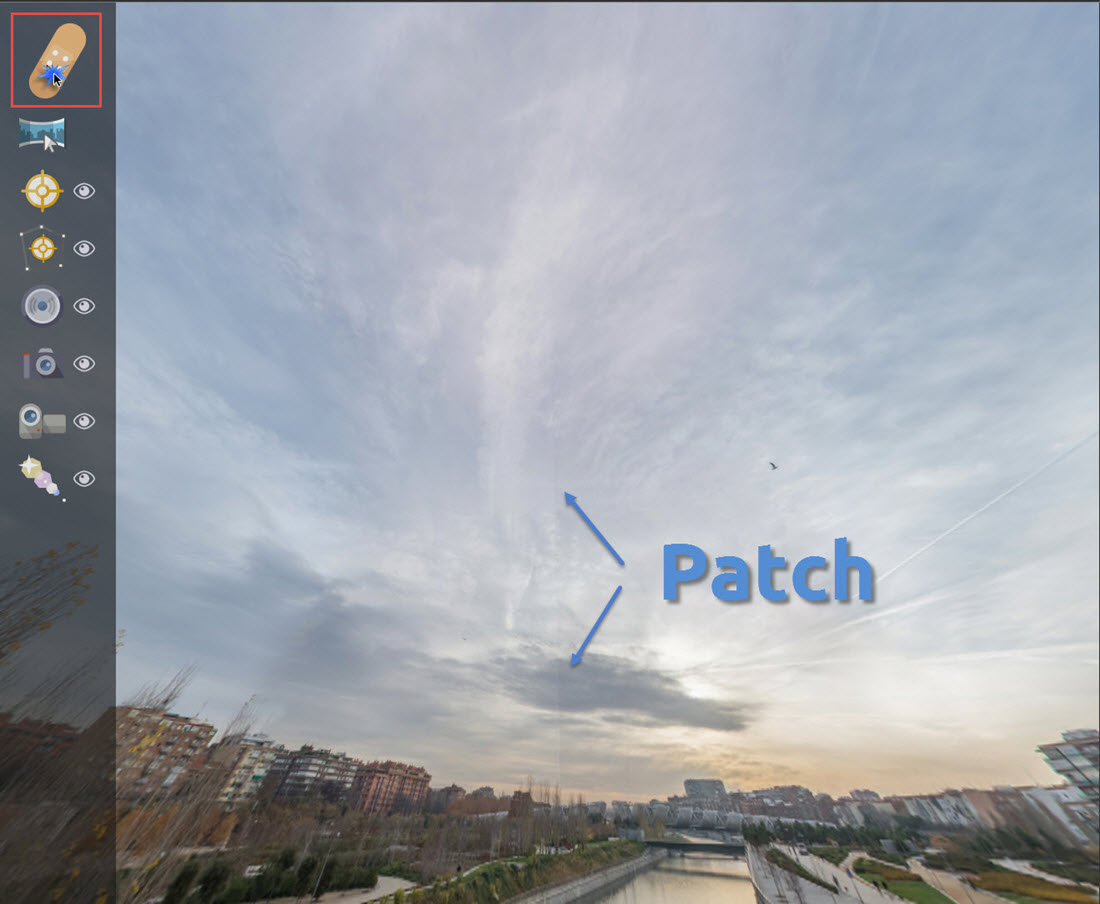
Find the line and Patch it
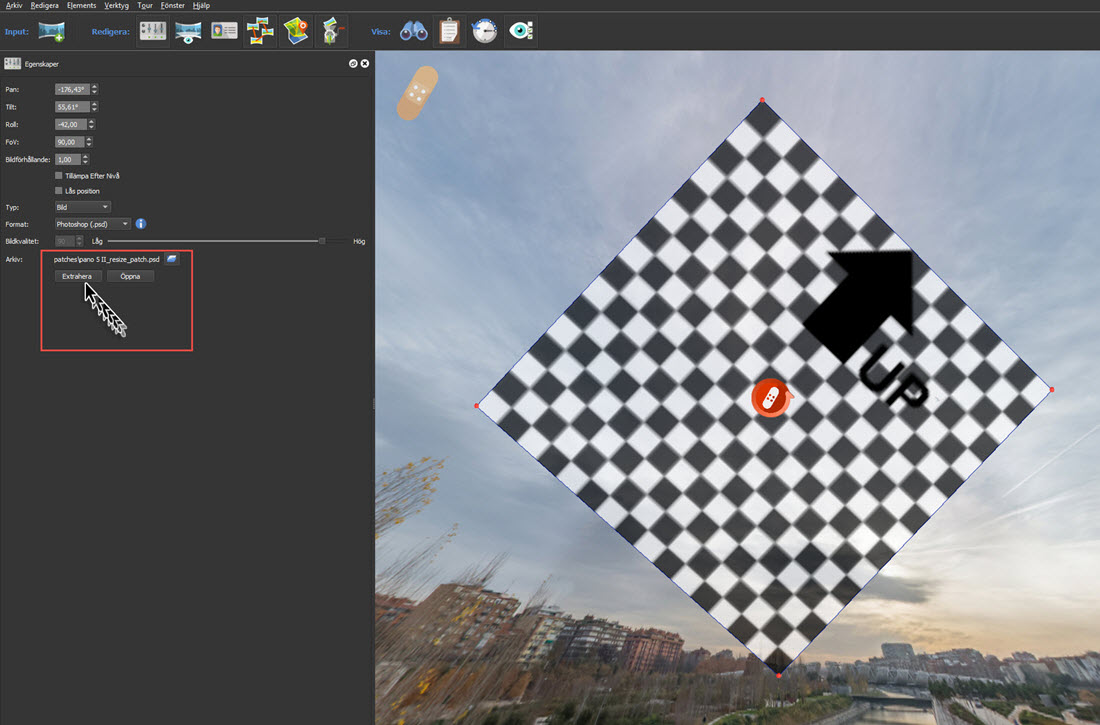
Extract it: PhotoShop or your standard .psd editor opens (here the Patch is turned 45 degree)
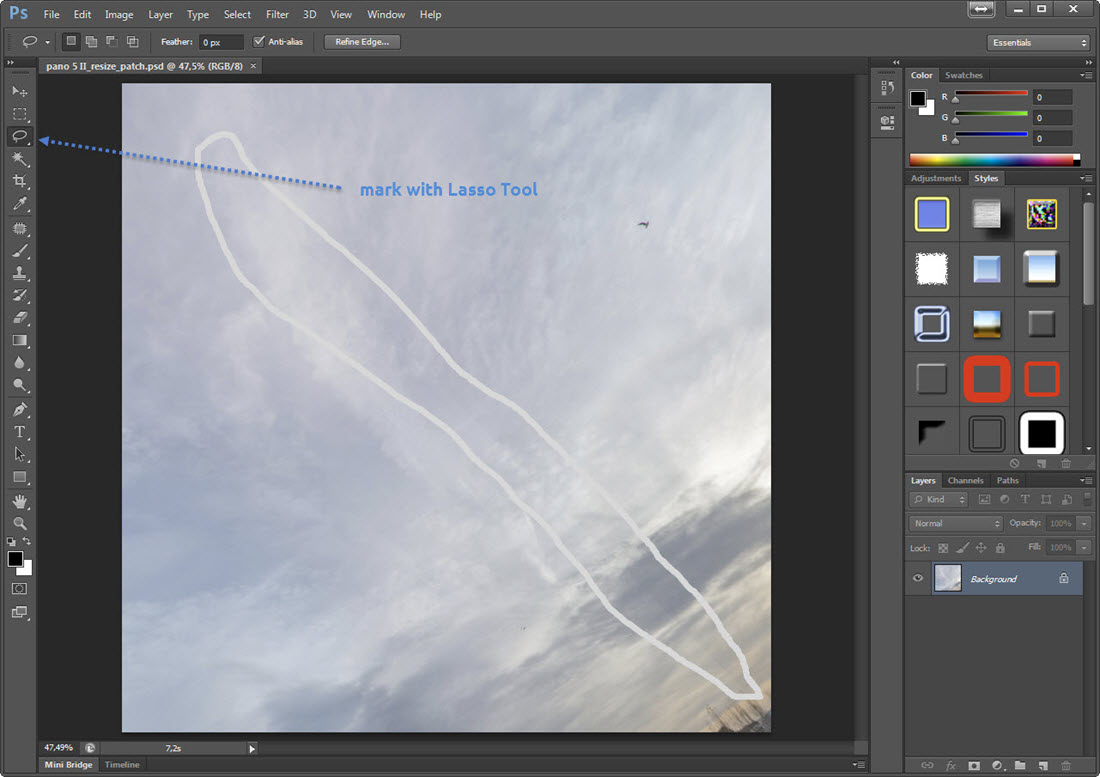
Mark the vertical line with the Lasso Tool
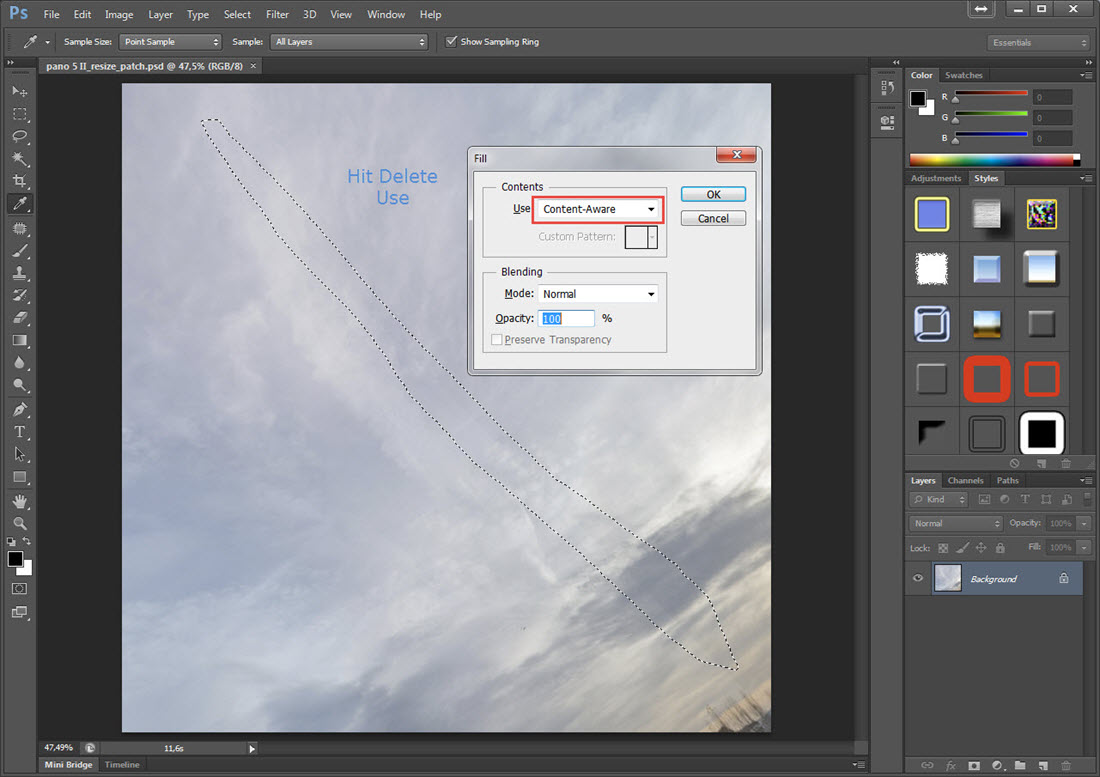
Use Content-Aware, hit Enter and PhotoShop magics fix the color difference

Save the changes Ctrl+S
The changes update automatically in Pano2VR5
Generate the Output and the lines have diapered
Yes i think PTGui Version 10.0.15 Pro (5 January 2016)
https://www.ptgui.com/
Version History
https://www.ptgui.com/versionhistory.html
And
Hugin Hugin 2015.0.0 - Panorama photo stitcher
http://hugin.sourceforge.net/
will do the job to day
https://www.ptgui.com/
Version History
https://www.ptgui.com/versionhistory.html
And
Hugin Hugin 2015.0.0 - Panorama photo stitcher
http://hugin.sourceforge.net/
will do the job to day
Vertical "lines" showing slight differences of exposure and/or color between two edges of a 360 panorama (the seam) is a common artifact created when using certain image editing functions in programs like Photoshop, Lightroom etc. that utilize areas of surrounding pixels for their adjustment algorithms.
Examples of these types of adjustments that can result in this (showing a "line") include-
- Clarity or other types of micro-contrast adjustments
- Shadows/Highlights tools
- "HDR" types of adjustments or filters (Photomatix, etc) with the exception of exposure "fusion" (such as used by Enfuse)
- If you are unsure if a global adjustment you have made has created this issue, shift (offset/wrap around) your image a few hundred pixels and inspect it for any appearance of a "line"
Some programs like Photomatix and SNS-HDR have a "360 image" check box that you can check to make it so that the program will apply the changes evenly across the panorama's seam. Others like Photoshop and Adobe Camera Raw (when used as a filter within Photoshop) do not.
If you *must* use one of these types of adjustments on a full equirectangular image and do not have an option for "360" within the program you are using- the way around this is to do the following-
1. select entire image and "copy"
2. Extend canvas size to twice the width, anchor the sizing to one side or the other (left or right).
3. Paste the copied equirectangular image into the new wider image and slide it to the edge. In effect creating a panorama that looks like a single 720-degree image.
4. Flatten the image and then apply whatever adjustments you wish to make.
5. Now change your canvas size back to the original size of the equirectangular image, using a center anchor point. Basically, you are cutting off each side equally of your 720 image to have a 360 image again.
Your panorama will now no longer have a "line" showing where the seam was, regardless of whatever global adjustments were made.
You *may* however have a very small "cat butt" looking artifact at the extreme top and bottom of the panorama (depending on the content of the image). These are small enough to easily be retouched manually after the panorama has been converted to cube faces. Or you can use P2VR's patch capabilities to fix these.