I'm new to the forum and fairly new to Pano2VR. However, I am very interested in learning more about creating custom skins for Flash Playback. I've looked through the Garden Gnome Web site and this forum and the software itself, but cannot find anything that takes someone step-by-step through the process (and possibly the underlying theory). Does anything like this exist? If I missed it, I apologize for wasting your time.
Thanks,
R2
Is there a "start-to-finish" tutorial on skins?
-
360Texas

- Moderator
- Posts: 3684
- Joined: Sat Sep 09, 2006 6:06 pm
- Location: Fort Worth, Texas USA
- Contact:
At this time... I do not think so.
The only issue I have with skins is that they should be functional and serve a purpose.
The object of a panorama is to show a clients product or to show a visitor the intention of the photographer. Skins seem to more distracting image border decoration or eye clutter which deflects away from the intent of the photographer.
Buttons that add functionality, serve to support the panorama viewing experience.

Thanks Dave. I agree with your premise - design should be functional - not just eye candy. My interest in skin design is just that. I don't want to a build a pretty frame around the pan or create something gosh-awful. However, I would like to design a control panel to help the user understand that they have control on the pans (up, left, down, right, expand full, etc). In my experience, most new users don't even know they can actually control the image a little. The sample skins they provide are pretty nice, but I'm looking for a little better. For example, I like the concept of the Firehell skins (http://gardengnomesoftware.com/forum/vi ... f=13&t=901 ). It presents good design, good function and some company branding as well.
Frankly, I would like to learn how to create something similar to this for my shop. Alas, I don't know how....
It sure seems that GG would be able to provide at least a very basic How-To on this - especially since it's a feature of their software. Maybe they have and I just can't find it....
HELP Garden Gnome!
R2
P.S. Was the Skins Editor a feature of Pano2QTVR?
-
360Texas
- Moderator
- Posts: 3684
- Joined: Sat Sep 09, 2006 6:06 pm
- Location: Fort Worth, Texas USA
- Contact:
Good Thoughts.
I found the Pano2VR GGS Skins folder on my C drive. Notice that it is located in the Application Data folder.
C:\Documents and Settings\Davecomputer\Application Data\GardenGnomeSoftware\Skins
I think these buttons are small enough not to intrude in camera view. Thanks Thomas.
You start selecting an exisiting 9 button transparent skin
controller http://gardengnomesoftware.com/forum/vi ... f=13&t=884
There are two small downloads:
One is the contoller_metal.ggsk completed bar
The other is metal_32x32.zip which contains 3 folders - 1 complete button set tinted gray, green and red
SKIN EDITOR - POSITION completed Controller into your Panorama.
Open Pano2VR beta 4b
Either FILE|OPEN (or RECENT) and load an existing stitched panorama
Output : New Output Format (select FLASH) and click the button [+Add]
My input file is 130mb TIF.
Tile Seetings 1150
Image Quality 90
Window Size 1024 x 600
Frame Rate 50
Render Quality 9
Check Mark selected Auto decrease/ Change Stage Quality / Change Bitmap Filtering/ Scaling with Window
OUTPUT
Format Flash 9
Output file J:\leveltwo\finals\tx.swf
Autorotate enabled
Pan Speed .2 deg /frame
Delay 3.0 seconds
Return to horizon 1.0
Skin/ Controller
Skin: Click the down button to select a new .ggsk in this event I selected contoller_metal.ggsk previously downloaded
Select the EDIT (to go into the Skin Editor)
View Width make it same height/width view window as your Flash panorama.
Since I created my Flash pano as 1024 x 600.. I will key in the View width 1024 Height 600 grid 8 Zoom 100% State Normal
Since we have the metal controller already selected it now contains 3 sets of metal buttons loaded. In the TREE box you will find 3 button states for the <- button 1 gray is normal, 2 green is mouse over, 3 red is selected.
Below the view box you will see the controller positioned 'center' bottom
Editor Id: shows 'Left'
The pixel start position 0,0 xy is the upper left corner of the viewer window (near the box title Editor)
Remember the view window box is 1024 pixels wide and 600 pixels hight.
The controller button cluster position (as measured at x 363 y 564. Thats 363 pixels from the left edge and 564 pixels down from top.
Now let move the button cluster to the left edge. Mouse click and drag the <- arrow box to left edge of window. Notice that the all the buttons follow the lead left side button.
The Editor Position X = now is 8 pixels. Thats not close enough. Manually change 8 pixels to read 1 pixel. That will snug the button cluster to the left edge.
Also notice the Anchor: 3 x 3 box... since we positioned the bar to lower left corner of the screen... click the lower left corner small box so the controller will be anchored to the bottom left corner of the window
We want to save our work so click FILE | Save As and give it a new file name - and remember with folder you put this new .ggsk.
Click the OK button on the lower right corner of the Skin Editor and return to the Flash OUTPUT box. Click OK again to return to INPUT window. In the process .. Pano2VR will ask if its ok to Creat the Output file containing the controller bar... Click YES.
In a few seconds ... Pano2VR will open the panorama after it has been created.
Now you are testing the buttons for porper functionality. <- -> UP/Down + - all seem to work properly.
The little HOUSE or home button seens to return the panorama to its original view postion.
The circle arrow seems to manually initiate the rotation.
And as expected the 'Full Screen' button does not function yet.
Full screen toggle seens to work with HTML code for the flash player permissions to 'Full Screen' parameter.
This explanation probably is too basic for you. But it is the beginning of this "How To"
FULL SCREEN code set techniques can be found http://gardengnomesoftware.com/forum/vi ... ?f=6&t=851
Shortly, I will explain how to add your own graphics like a gradient panel behind the controller, and adding 1 button at a time using your own prepared button graphics.
One observation I have noticed is that using the Skin Editor is a simple approach to creating a rather elegant enhancement to your panoramas using your own buttons. I have been trial testing other Flash skin processes and they require using layers and pre made controllers developed using Adobe Flash program. Pano2VR's skin editor is probably UNDER appreciated therefor under used. Hopefully, this small explanation will promote better skin usage.
Wow, thanks again Dave. The "lesson" on adding the skin was very thorough. To be honest, I hadn't tried adding one yet, but your instructions will surely prove invaluable. I did find the Skins directory on my Mac previously, and I had seen the post you referenced with the ZIP files. Putting it all together was the challenge, which you've now explained. I appreciate it much.
That said, I am VERY interested in your "next installments" -- adding the background and creating custom buttons. And, if I'm not asking for too much, instructions for adding the company logo to the controller 'bar" would also be very helpful.
When I first found Pano2VR, I was skeptic at the batch processing....until I tried it and then compared outputs with the same settings in RealViz. No comparison. Quality - same. Functionality - P2VR wins hands down. Speed - Don't even think I'll go back to the old way. I'm completely sold on this product. It's one of the better kept secrets of the pano world in my book.
That said, it seems like GG ought to share your information with all users (not just the forum users), and add all of your instructions to their Wiki at the very least.
Thanks again
R2

Thx Dave for the in deep explanation!!! My plan is to make a tutorial for the skin editor and the first part is already uploaded. http://gardengnomesoftware.com/tutorial.php?movid=06 I hope the rest will follow soon.
MfG, Thomas
-
360Texas
- Moderator
- Posts: 3684
- Joined: Sat Sep 09, 2006 6:06 pm
- Location: Fort Worth, Texas USA
- Contact:
Almost magic. Yes that was what I was trying to explain. However, YOUR MOVIE TUTORIAL says it ALL in just few minutes. Placing the solid rectangle GGS Logo is the same concept as placing a gadient box. Only item is using semi transparent gradient you must save your images as a .png 24 file fomat. png 8 will be solid color
I noticed in the movie using the MAC that the 3x3 ANCHOR grid is dark gray. In the PC version the Anchor grid selection box is light gray - almost can not see difference between selected box and background.
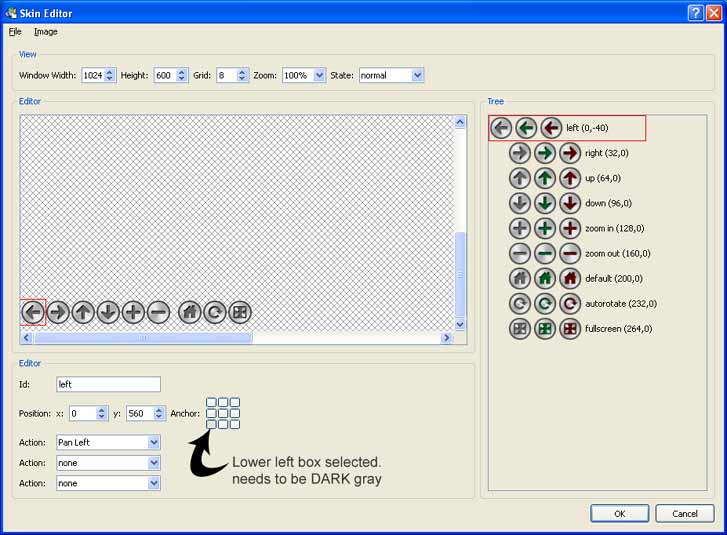
I noticed in the movie using the MAC that the 3x3 ANCHOR grid is dark gray. In the PC version the Anchor grid selection box is light gray - almost can not see difference between selected box and background.
-
360Texas
- Moderator
- Posts: 3684
- Joined: Sat Sep 09, 2006 6:06 pm
- Location: Fort Worth, Texas USA
- Contact:
In Photoshop I created a NEW transparent background 75 pixels high x 1920 (my 24" monitor pixel width) blank image. Then I used gradient from brown on left to transparent on right gradient. Saved it 'save for web' PNG24 file format file.
Then I went and opened - copied/ pasted my company logo transparent saved as png 24 format and brought it in as a layer over the brown gradient bar. Saved both gradient and logo as a png 24 file format image.
Why is the gradient bar so wide ? Because if the gradient bar is only 800 pixels wide it will not extend to full monitor width of 1920 pixel width. So I just made the gradient bar extra wide.. so when clicking the FULL SCREEN you will see that hidden section of the bar.
In Pano2VR skin editor opened the file I created yesterday using the metal buttons.
I brought in the logo/gradient file and it was placed on the bottom of the "Tree button box". My first thought was to drag it to the top of the Tree list. So I tagged the gradient bar and drug it to the TOP and the SKIN EDITOR and PANO2VR immediately abnormally ENDED. [Thomas possible bug].
Opened Pano2VR and Skin Editor again. Seems that the Tree items that are on the bottom of the Tree list are the TOP LAYER. Not wanting to crash the program again... this time I selected the [<-] arrow set and dragged down below the brown gradient bar tree item. It worked.
Again, this is probably two simple but it provide a good result. Not yet my favorite. It is beginning to look something like what is being done with FlashPanorama program. Below is result
In beta4 its even uglier on the Mac. This control will be new in beta 5, so starting with that version you will have this improved anchor control in Windows, Mac and Linux. I hope I can post this new version soon.360Texas wrote:I noticed in the movie using the MAC that the 3x3 ANCHOR grid is dark gray. In the PC version the Anchor grid selection box is light gray - almost can not see difference between selected box and background.
MfG, Thomas
Pardon my denseness. I have read Dave's (360Texas) impromptu tutorial and watched Thomas's video toturial, but burning questions persist:
On most of the ggsk examples, when opened in the skin editor, I see two or sometimes three buttons in one row (like the skin that was posted by Thomas called controller_metal.ggsk). They represent different "states", for normal, mouseover and select. How do I get three images on one row in the skin editor...? I have tried dropping them on the same row, but they always want their own row.
My other question is if it is already possible to pop up a regular image (2D picture) inside a panorama if one clicks on a hotspot? Is there a way to place custom hotspot images, or is one expected to place those in the equirectangular in advance?
This would be a feature request for the hotspot editor I guess..?
Carel
-
360Texas
- Moderator
- Posts: 3684
- Joined: Sat Sep 09, 2006 6:06 pm
- Location: Fort Worth, Texas USA
- Contact:
Carel, this morning [its 9:30a here in Central Texas Time] I will attempt to talk about the 3 button workflow.
In the Skin Editor how do we link to audio sound files?
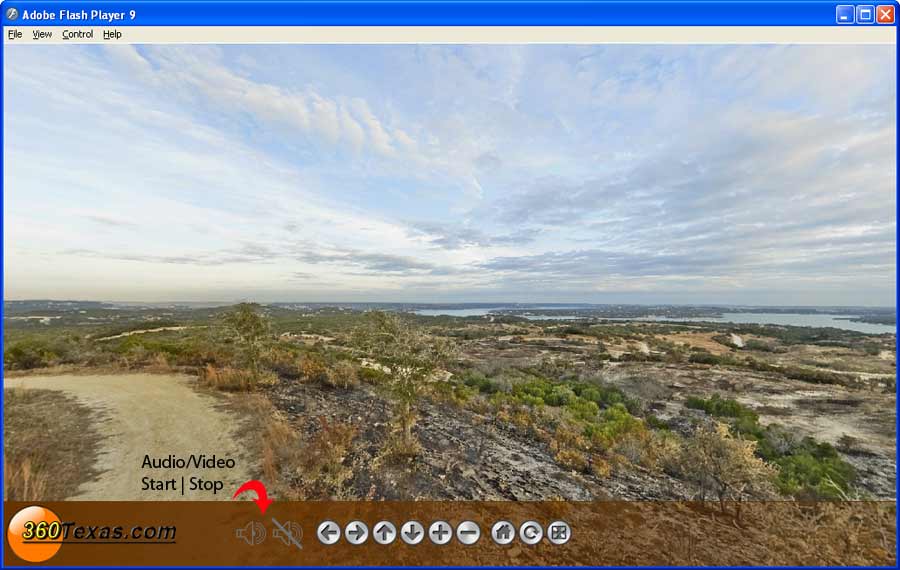
Audio on/off Background: In pano2qtvr/with Flashtrax we were able to add a small .swf audio loop sprite. In Pano2VR Skin Editor I created 2 transparent [png24] 1 of on and 1 for off. When I clicked on the ON button and scrolled through the list of ACTIONs I found Audio/Video PLay and Audio/Video Stop. I was hoping to see a edit box that would link to my audio loop called sonic.swf or .mp3 or .wav sound file. HELP anyone ?
Next on list is 3 button work flow with some pictures
In the Skin Editor how do we link to audio sound files?
Audio on/off Background: In pano2qtvr/with Flashtrax we were able to add a small .swf audio loop sprite. In Pano2VR Skin Editor I created 2 transparent [png24] 1 of on and 1 for off. When I clicked on the ON button and scrolled through the list of ACTIONs I found Audio/Video PLay and Audio/Video Stop. I was hoping to see a edit box that would link to my audio loop called sonic.swf or .mp3 or .wav sound file. HELP anyone ?
Next on list is 3 button work flow with some pictures
-
360Texas
- Moderator
- Posts: 3684
- Joined: Sat Sep 09, 2006 6:06 pm
- Location: Fort Worth, Texas USA
- Contact:
Ok.. I thought I read somewhere in the forum about how to cluster [normal, mouse over, select] buttons but I do not seen to know where I read about it. I was creating a How To Tutorial with screen instructions.
The how-to is deferred until I get my head around it again.
The how-to is deferred until I get my head around it again.
Dave,
Thomas provided an answer earlier this morning. I had also asked the "state" thing a day before as part of a different question.
Here is his answer:
Thomas provided an answer earlier this morning. I had also asked the "state" thing a day before as part of a different question.
Here is his answer:
CarelJust change the state, select and image, and choose "Apply Image" from the menu. You can also drag & drop the other image over the current version in that state.
-
360Texas
- Moderator
- Posts: 3684
- Joined: Sat Sep 09, 2006 6:06 pm
- Location: Fort Worth, Texas USA
- Contact:
Yes, I did read that.. and tried it with out sucess of getting all 3 button images to be grouped in the tree as 1 line
Also the SELECT state is the one with the action. OF course my action was to enable Audio/Video PLAY to play an audio mp3 loop .swf. But did not find a place to enter the audio file name.
Also the SELECT state is the one with the action. OF course my action was to enable Audio/Video PLAY to play an audio mp3 loop .swf. But did not find a place to enter the audio file name.